

Design It Yourself Molding and Casting Kit Instructions
If you wish to download and print out the instructions you can do so by clicking here. I recommend having a copy of these on hand when you are molding/casting so you don't forget an important step.
This kit was designed specifically for the creation of highly detailed backgrounds, waterfalls, water-bowls, hide rocks, and other vivarium/aquarium decor.
Please read these instructions before beginning your project. The better prepared you are before you start your design, the better it will turn out.
I also recommend viewing the Tutorials and Build Journals.
Please read these instructions before beginning your project. The better prepared you are before you start your design, the better it will turn out.
I also recommend viewing the Tutorials and Build Journals.
STEP ONE: MAKING THE MOLD
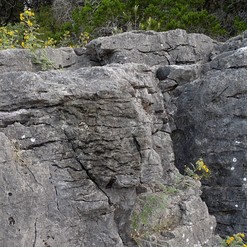
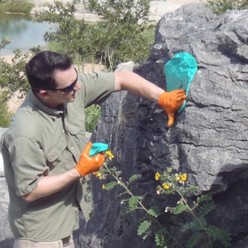
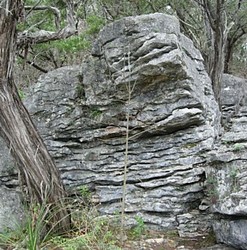
A. Find your original model to copy.
I used a boulder at a local park.
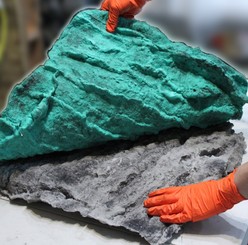
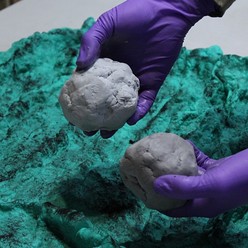
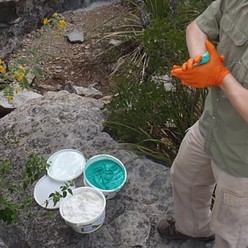
B. Mix the Exhibit:MOLD A and B in equal volumes. Make equal sized balls, compare by eye, and kneed together to mix. It is fully mixed when color is even with no white/green streaks. Gloves are recommended and supplied.
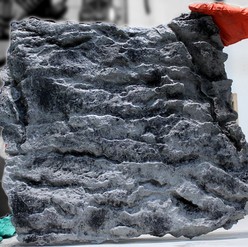
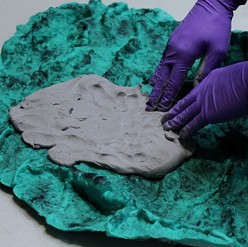
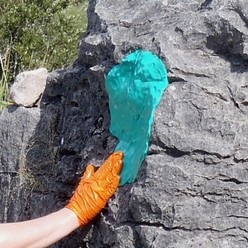
C. Press mixed molding putty onto surface of model, rock-wall, tree bark, etc. Press putty firmly onto surface to capture fine details. (Avoid using excessive material to fill voids and cavities. The less you use in these the easier it is to remove and the larger the mold you can make.)
D. When using multiple mixed batches, be sure to press the new batch in firmly with the batch already on the model. This will help seal the two batches together. (Not properly pressing a new mixed batch onto the edge of an old batch can create lines where they meet in your mold. This putty was designed to help reduce this. The less time between batches the better the two can mix and stronger the mold. Having a helper for large molds is highly recommended.)
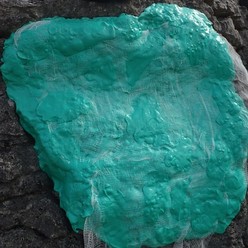
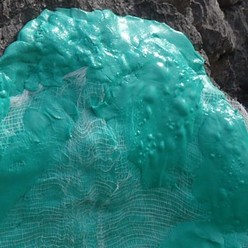
E. After the last batch has been pressed on, or midway on larger molds, stretch out the cotton gauze and press the cotton grid into the molding putty. Press it just slightly into the putty and rub it in so putty covers much of the gauze. (The cotton grid strengthens the mold and helps prevent tears from going long distances across the mold. This step is not mandatory, but it’s highly recommended. It’s easier the earlier you apply it. The longer the putty has to cure, the harder it will be to press in the cotton gauze.)
F. Allow the Exhibit:MOLD to cure for at least one hour @80F. It will take longer at lower temperatures and will cure faster at higher. You can tell when it’s cured by feeling the last batch you applied. It should be hard with a little bit of flex. (It’s normal for the molding putty to weep a mineral oil on the surface when it’s curing. This is non-toxic and can be wiped off with paper towels.)
STEP TWO: DEMOLD and Cast into the MOLD
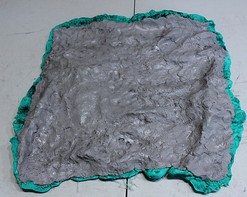
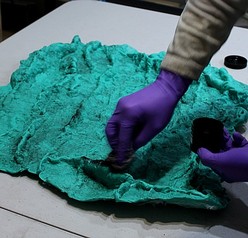
A. Once cured, remove the mold from your model slowly and carefully. (It is best to start from the side of the oldest mixed batch first, and slowly press your fingers up between the mold and model surface. Go slow, take your time, and try differing angles. Sometimes it’s better to remove the mold from a different angle if you are having trouble with it separating. Once removed, place the mold into a plastic bag or trash bag to help keep the weeping mineral oil, produced when curing, from getting all over things. Especially helpful when making the mold in the field. Exhibit:MOLD is environmentally safe and any remaining mineral oil is broken down and washed away quickly.)
Before casting into your mold or going onto the next step, I recommend giving your mold a very light spraying of PAM baking spray. This acts to help release your cast from the mold and makes the demold step easier. It also give something for the color powders to bind to. Go easy on it, you only need a very little amount and rub it around and into the cracks of the mold. You can wash the PAM off your mold easily before use in your vivarium/aquarium.
B. To add color and depth to your mold, apply to the raised sections of your mold the black iron oxide powder using a paper towel. Smearing this powder over the bumps, hills, and raised areas of your mold will make the cavities, holes, and recesses of your mold dark, and greatly improve the visible detail of your mold. If doing multiple colors, put down the black first, then add in the other colors around it.
C. Mix equal parts of Exhibit:CAST A and B putty by volume. Gloves are required. Make small balls, compare by eye, and kneed the two together. Mix until even in color with no color streaks. (All epoxies can eventually cause an allergic response in people who work them often. By wearing gloves you will avoid becoming sensitized to the hardener. Once cured it is 100% safe, but in the uncured state it, epoxy should not be handled with bare hands. It also makes cleanup much easier.)
D. Press the Exhibit:CAST into your mold. Exhibit:CAST is very strong, even in thin sections so you can press the putty along to cover large areas. Early after mixing Exhibit:CAST can be very sticky and want to stick onto your gloves more than the mold. One trick is to allow it to set for about a half hour and then continue to press it into the mold. Another is to use just your fingertips and go slow.
E. Allow the Exhibit:CAST to cure for 24 hours at room temperature. During this wait time you can measure out the exact dimensions you want your background in and use a soft tool, Popsicle stick, or side of a ruler to make lines in the Exhibit:CAST down to the mold. This will allow you to break off the excess and have a ready to fit background with minimal cutting required. Best done before the epoxy sets hard. (1-2 hours)
STEP THREE: DEMOLDING & FINISHING THE CAST
A. After the cast has cured, remove it from the mold slowly and carefully. The Exhibit:Mold will flex slightly and by teasing your fingers along the edges of the cast you can slowly separate the two. More detailed and deeper crevices will be more challenging to remove, but as with separating the mold from the original model, sometimes a different angle will help if you are stuck on an area. A large flathead screwdriver can help with hard crevices, just try not to damage your mold by being too forceful.
B. Once your cast is removed you can wash it with dilute soap and water to remove any PAM or mineral oil that has transferred from the mold. You can cut your cast using a hacksaw, small toothed serrated knife, or table/band saws. I find it easiest to adjustment my casts’ size while still in the mold and curing, but a hacksaw and sandpaper work very well on cured casts too.
A. Find your original model to copy.
I used a boulder at a local park.
B. Mix the Exhibit:MOLD A and B in equal volumes. Make equal sized balls, compare by eye, and kneed together to mix. It is fully mixed when color is even with no white/green streaks. Gloves are recommended and supplied.
C. Press mixed molding putty onto surface of model, rock-wall, tree bark, etc. Press putty firmly onto surface to capture fine details. (Avoid using excessive material to fill voids and cavities. The less you use in these the easier it is to remove and the larger the mold you can make.)
D. When using multiple mixed batches, be sure to press the new batch in firmly with the batch already on the model. This will help seal the two batches together. (Not properly pressing a new mixed batch onto the edge of an old batch can create lines where they meet in your mold. This putty was designed to help reduce this. The less time between batches the better the two can mix and stronger the mold. Having a helper for large molds is highly recommended.)
E. After the last batch has been pressed on, or midway on larger molds, stretch out the cotton gauze and press the cotton grid into the molding putty. Press it just slightly into the putty and rub it in so putty covers much of the gauze. (The cotton grid strengthens the mold and helps prevent tears from going long distances across the mold. This step is not mandatory, but it’s highly recommended. It’s easier the earlier you apply it. The longer the putty has to cure, the harder it will be to press in the cotton gauze.)
F. Allow the Exhibit:MOLD to cure for at least one hour @80F. It will take longer at lower temperatures and will cure faster at higher. You can tell when it’s cured by feeling the last batch you applied. It should be hard with a little bit of flex. (It’s normal for the molding putty to weep a mineral oil on the surface when it’s curing. This is non-toxic and can be wiped off with paper towels.)
STEP TWO: DEMOLD and Cast into the MOLD
A. Once cured, remove the mold from your model slowly and carefully. (It is best to start from the side of the oldest mixed batch first, and slowly press your fingers up between the mold and model surface. Go slow, take your time, and try differing angles. Sometimes it’s better to remove the mold from a different angle if you are having trouble with it separating. Once removed, place the mold into a plastic bag or trash bag to help keep the weeping mineral oil, produced when curing, from getting all over things. Especially helpful when making the mold in the field. Exhibit:MOLD is environmentally safe and any remaining mineral oil is broken down and washed away quickly.)
Before casting into your mold or going onto the next step, I recommend giving your mold a very light spraying of PAM baking spray. This acts to help release your cast from the mold and makes the demold step easier. It also give something for the color powders to bind to. Go easy on it, you only need a very little amount and rub it around and into the cracks of the mold. You can wash the PAM off your mold easily before use in your vivarium/aquarium.
B. To add color and depth to your mold, apply to the raised sections of your mold the black iron oxide powder using a paper towel. Smearing this powder over the bumps, hills, and raised areas of your mold will make the cavities, holes, and recesses of your mold dark, and greatly improve the visible detail of your mold. If doing multiple colors, put down the black first, then add in the other colors around it.
C. Mix equal parts of Exhibit:CAST A and B putty by volume. Gloves are required. Make small balls, compare by eye, and kneed the two together. Mix until even in color with no color streaks. (All epoxies can eventually cause an allergic response in people who work them often. By wearing gloves you will avoid becoming sensitized to the hardener. Once cured it is 100% safe, but in the uncured state it, epoxy should not be handled with bare hands. It also makes cleanup much easier.)
D. Press the Exhibit:CAST into your mold. Exhibit:CAST is very strong, even in thin sections so you can press the putty along to cover large areas. Early after mixing Exhibit:CAST can be very sticky and want to stick onto your gloves more than the mold. One trick is to allow it to set for about a half hour and then continue to press it into the mold. Another is to use just your fingertips and go slow.
E. Allow the Exhibit:CAST to cure for 24 hours at room temperature. During this wait time you can measure out the exact dimensions you want your background in and use a soft tool, Popsicle stick, or side of a ruler to make lines in the Exhibit:CAST down to the mold. This will allow you to break off the excess and have a ready to fit background with minimal cutting required. Best done before the epoxy sets hard. (1-2 hours)
STEP THREE: DEMOLDING & FINISHING THE CAST
A. After the cast has cured, remove it from the mold slowly and carefully. The Exhibit:Mold will flex slightly and by teasing your fingers along the edges of the cast you can slowly separate the two. More detailed and deeper crevices will be more challenging to remove, but as with separating the mold from the original model, sometimes a different angle will help if you are stuck on an area. A large flathead screwdriver can help with hard crevices, just try not to damage your mold by being too forceful.
B. Once your cast is removed you can wash it with dilute soap and water to remove any PAM or mineral oil that has transferred from the mold. You can cut your cast using a hacksaw, small toothed serrated knife, or table/band saws. I find it easiest to adjustment my casts’ size while still in the mold and curing, but a hacksaw and sandpaper work very well on cured casts too.
Backgrounds, rocks, and other décor made from Exhibit:CAST are extremely light weight, very strong, and animal and aquarium safe. Casts can be so light they can float if placed underwater. If you wish to use your cast in an aquarium or underwater section of your vivarium, I recommend gluing your cast down to the glass using silicone sealant or the canned spray foam ‘Great Stuff’. Or another trick is to encase a few small rocks into the back of your cast to weigh it down.
Print Instructions