

Instructions
1. Find your model that you wish to copy for your background, waterfall, hide-rock, or aquarium decor.
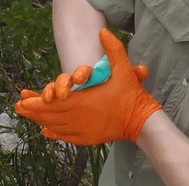
2. Wearing gloves, gather equal volume balls of the Exhibit Mold and mix/kneed together until a uniform green color is achieved.
3. Press the Exhibit Mold onto your model surface face. You can press it into the crack and crevices but remember you want to make it possible to remove it later so don't fill large cracks and voids such that you can't get the set molding putty back out/off.
4. Press the molding putty along the surface of the model. This helps to reduce the amount used and increases the size of your mold. The minimum thickness of all spots on your mold should be about half the thickness of your finger. Thicker molds are stronger but they cost more in material and are less flexible.
5. Quickly mix up another batch of Exhibit Mold and continue pressing onto the sides of the first batch in a single direction. You want to press the two batches together hard where they meet and allow them to mix so you don't get lines in your mold.This is best done by pressing on subsequent batches before the prior batch has begun to harden much. In large molds or hot temperatures, I find it is best to have a helper to mix the batch while you press it on.
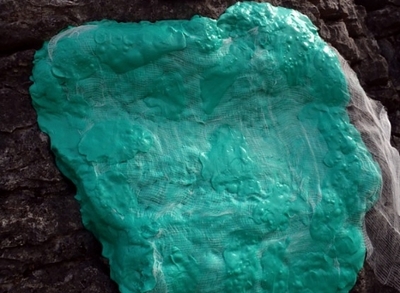
6. A trick to help strengthen your mold, and increase the number of times you can use it, is to press into the back of the mold a grid of cotton. By opening up the cotton gauze and pressing it into the molding putty before it has begun to set will help create a tear-resistant mold. I highly recommend doing this for most applications, as the molding putty's biggest weakness is tears.
7. Allow the Exhibit Mold to cure for at least one hour at 75F since the last batch you applied. It may take longer at cooler temperatures and may set faster in warmer temperatures.
8. Once the the Exhibit Mold has cured, you can begin to demold it from your model. Go slow and take your time. It is best to start at one end and slowly tease your fingers between the model and the putty by slowly pressing up between the two. Take your time and be gentile. If you seem stuck on one area, start at another and try from a different angle. If you are stuck on crevice or section you can use a flathead screwdriver to pry up the putty from the model, but be careful to not damage it.
9. If in the field, I find it best to place my molds into a plastic bag or trash bags for larger molds. This helps to keep the mineral oil that is sometimes released during the curing process from getting all over things, and if you use a black trash bag it helps to trap heat in with the mold and help cure it even further, increasing the final strength of your mold.
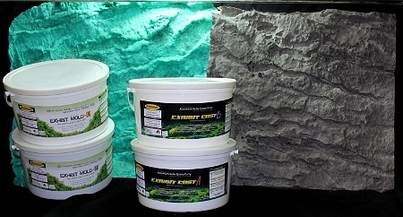
10. Exhibit Mold was designed to be used with Exhibit Cast but all kinds of casting materials can now be used in your mold.
11. When using your molds be sure to take care, and demold them slowly and carefully as you had from the original to help keep your mold intact for multiple uses.
1. Find your model that you wish to copy for your background, waterfall, hide-rock, or aquarium decor.
2. Wearing gloves, gather equal volume balls of the Exhibit Mold and mix/kneed together until a uniform green color is achieved.
3. Press the Exhibit Mold onto your model surface face. You can press it into the crack and crevices but remember you want to make it possible to remove it later so don't fill large cracks and voids such that you can't get the set molding putty back out/off.
4. Press the molding putty along the surface of the model. This helps to reduce the amount used and increases the size of your mold. The minimum thickness of all spots on your mold should be about half the thickness of your finger. Thicker molds are stronger but they cost more in material and are less flexible.
5. Quickly mix up another batch of Exhibit Mold and continue pressing onto the sides of the first batch in a single direction. You want to press the two batches together hard where they meet and allow them to mix so you don't get lines in your mold.This is best done by pressing on subsequent batches before the prior batch has begun to harden much. In large molds or hot temperatures, I find it is best to have a helper to mix the batch while you press it on.
6. A trick to help strengthen your mold, and increase the number of times you can use it, is to press into the back of the mold a grid of cotton. By opening up the cotton gauze and pressing it into the molding putty before it has begun to set will help create a tear-resistant mold. I highly recommend doing this for most applications, as the molding putty's biggest weakness is tears.
7. Allow the Exhibit Mold to cure for at least one hour at 75F since the last batch you applied. It may take longer at cooler temperatures and may set faster in warmer temperatures.
8. Once the the Exhibit Mold has cured, you can begin to demold it from your model. Go slow and take your time. It is best to start at one end and slowly tease your fingers between the model and the putty by slowly pressing up between the two. Take your time and be gentile. If you seem stuck on one area, start at another and try from a different angle. If you are stuck on crevice or section you can use a flathead screwdriver to pry up the putty from the model, but be careful to not damage it.
9. If in the field, I find it best to place my molds into a plastic bag or trash bags for larger molds. This helps to keep the mineral oil that is sometimes released during the curing process from getting all over things, and if you use a black trash bag it helps to trap heat in with the mold and help cure it even further, increasing the final strength of your mold.
10. Exhibit Mold was designed to be used with Exhibit Cast but all kinds of casting materials can now be used in your mold.
11. When using your molds be sure to take care, and demold them slowly and carefully as you had from the original to help keep your mold intact for multiple uses.
Frequently Asked Questions
What is the difference between Exhibit Mold and other silicone molding putties?
Exhibit Mold was designed specifically for molding vivarium and aquarium rock background and decor while in the field. The thickness of the putty is the right viscosity to allow for large volumes of material to be mixed up by hand quickly so you can make your molds quickly and easily. The putty has a long pot life of about 7 minutes depending on temperature, but a demold time of 1 hour at 80°F. These set times and ease of use was designed to make molding in the field possible without needing scales, mixing cups, brushes and can be applied to vertical surfaces easily. The putty is a vibrant green so you can see exactly any spots you have missed while hand mixing. The human eye can detect many more subtle shades of green than any other color, and with Exhibit Mold being a vibrant green when mixed, you can see if you missed a spot more easily than other colored putties. I've tried working with multiple other putties on the market and couldn't find one that fit my needs, so I made my own version and now I'm offering it to the rest of the hobby. When I make my molds in the field to produce the backgrounds and rocks that I sell, this is the material I use.
How can I repair a tear in my mold?
The major drawback of any molding putty is that tears tend to run once started. I have found the best fix is to prevent them from happening in the first place by using the cotton gauze as a support and rip preventing material. If you get a hole or a tear in your mold, you can either use more Exhibit Mold onto the spot you wish to repair or you can use silicone caulk. If you use the silicone caulking material you need to use "GE Silicone 1" as the other kinds will not cure. Whichever material you use you'll want to dry the teared area of any mineral oil and press the new silicone on hard to try and get a good seal.
What is the clear fluid the mold is making when it's curing?
This is a mineral oil. It is commonly used in the food industry to coat candies to keep them from sticking to each other. have taken to bringing paper towels and plastic bags with me and wiping down the molds and then placing them into the bags to keep it from getting on other stuff. I also use gloves when handling my molds during casting. It's not dangerous and washes off but can be a nuisance if you are not prepared for it.


Chose what to mold.
Apply mixed silicone putty onto the model surface.
Press mixed batches together and use the cotton fiber for tear resistance.

Mix equal volumes A & B
Final Product