How To Drill a Hole in Glass Aquariums


Why drill the tank?
The amount of filtration needed in most vivarium systems is relatively large. The soil will be leaching out large volumes of solutes into your water that will build up as the water evaporates. The tea color quickly seen in most vivarium water features is due to the buildup of these solutes, primarily tannins in the wood and soil. These tannins and other organic acids in low concentrations are not a problem and can actually help by making available nutrients in the soil and water to your plants. However, in higher concentrations it will stunt plant growth, leave unsightly waterspots and can negatively affect aquatic/amphibian life. Because of this, newly setup vivariums with recirculating water need to have periodic water changes to remove the buildup of these solutes. These needed water changes can be done a multitude of ways, but the best option I’ve found is to use a canister filter or sump. But In order to use these filters you'll need a hole with a bulkhead in place.
What is a bulkhead and do I need one?
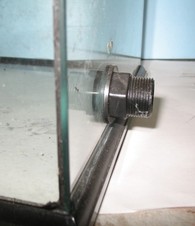
A bulkhead is a plastic piece that seals a drilled hole in glass or acrylic and forms a waterproof in/out water conduit. By putting one of these into your tank you can easily plumb in a basic on/off ball valve which can be used to drain your tank easily. If you have a design without a recirculating water supply it is advised to use one these to allow excess misting water to passively drain into a collecting bucket to prevent soil flooding. Bulkheads are designed to form a tight seal against the glass and when used properly can prevent leaking despite high water pressures. While it would be possible to just silicone a tube into a hole rather than use a bulkhead, a silicone blob will not hold up to the kinds of pressure/abuses that a bulkhead will.
In order to put in a bulkhead, your aquarium glass/acrylic needs to have a hole in it. For acrylic tanks this is usually not too difficult as basic hole drill bits used for wood will also work for thin acrylic. However for glass, specialized tools and procedures need to be used. I present the method I use here.
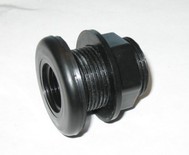
Bulkheads come in different sizes and styles. The thread / slip refers to the interior of the bulkhead. If it's threaded you can screw in male connectors of the same diameter. If its slip you need to glue in PVC piping. I prefer threaded as it is easily removable, however you do often need plumbers tape to make a proper seal.
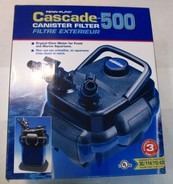
External filters extend the time between water changes and allow for very easy water changes.
The rubber o-ring goes on the inside of the aquarium.
Before You Start
Drilling glass is loud, challenging, and can be dangerous if you are not careful. The easiest and safest way to drill your tank is to go to a local aquarium specialty store and have them drill it for you. Many will do for somewhere between $15-$20 per hole. As this can become expensive pretty quick, doing it yourself can help save you money on multiple builds. A key thing to remember is that this method is only able to drill non-tempered glass. If there is a sticker on the aquarium, usually on the bottom, that says “do not drill” or “tempered” or anything of that sort, don’t drill the tank. Most 55 gallon and lower aquariums are not tempered along with any of the ZooMed/Exo-Terra cages. However if you are not certain, it's best to look up online or call the manufacturer to see if their tanks use tempered glass.
Safety
Drilling glass can be dangerous as you will be using a power drill or drill press and glass. Broken glass is very sharp, especially when pressure and high-speed power tools are involved. Wear safety goggles and do this in a place where broken glass will not be a major problem if you break your tank. Use common sense and go slow, drilling can take a while.
Materials
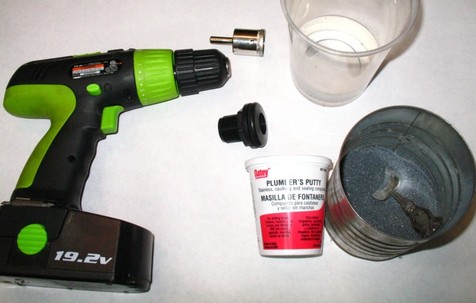
Power Drill or Drill Press
Proper Size Steel or Diamond Glass-Drilling Bit
Plumbers Putty or other waterproof clay
Carbide Powder Drilling Compound
Water
Eye Protection
Steady Hand or Drill Press
Patience
Bulkhead
Details
1. Using a marker determine roughly where you want your bulkhead to go. Be sure to leave enough space for the bulkhead from the aquarium edges and trim.
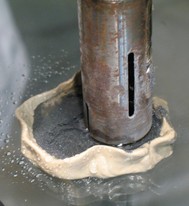
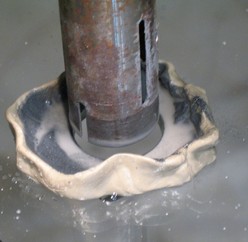
2. Orient the tank such that the hole is on the top and make a dam of clay around the area to be drilled. It’s a good idea to put just below the hole a catch bucket for the glass piece and liquid/carbide.
3. Add a few spoonfuls of carbide powder into the dam along with some water. You want a soupy mix.
4. Using a steady hand or drill press with the proper drilling bit, begin to spin the bit while applying pressure. You should hear an extremely loud and high pitch grinding noise.
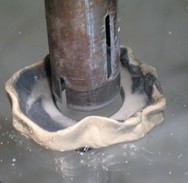
5. Continue applying pressure while spinning the bit, occasionally lifting the bit a very small distance up to allow more of the carbide cutting powder to fill into the cutting trench you’ve created.
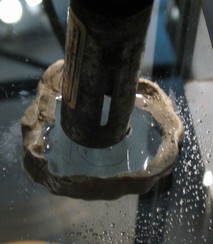
6. Continue until you see the water/carbide mix begin to pour out and keep applying pressure/spin until the hole is completely made. The amount of time needed to drill your aquarium will be dependent on the glass thickness, the speed of your drill, and the pressure you apply. Keep in mind too much pressure will break your glass.
| Bulkhead Size | Hole in Glass Diameter |
| 1/2" | 1 1/8" Hole |
| 3/4" | 1 7/16" to 1 1/2" Hole |
| 1" | 1 3/4" Hole |
| 1.5" | 2 3/8" to 2 1/2" Hole |
| 2" | 2 7/8" to 3" Hole |
Bulkhead Size to Hole Diameter Chart
Tips
Unless you absolutley have to, avoid drilling the bottom of the aquarium. This is mainly because it makes moving it and putting it onto a flat surface very hard. After breaking an aquarium by it shifting off its supports and falling onto the bulkhead on the bottom, I will never drill the bottom again. Also many bottoms on larger aquariums are tempered.
The method I have listed is for using carbide and steel drill bits. Drillglass.com sells diamond glass drilling bits that work well. You don't need the carbide powder for the diamond drill bits. I drill holes often and have found the carbide method to work well for me, so its what I use. Using a diamond drill bit, is very similar only you might consider using a greater water volume to help cool the diamond bit.
In order to avoid the bit from "walking" all over before a groove is established you can start off drilling at an angle and then slowly coming vertical. I use a drill press so this is not often an issue, but is something to keep in mind if using a hand drill.